Tuesday, June 25, 2013

Inkle Loom Round Robin

Carolyn gave me her inkle loom when I was visiting her in Tucson recently.  We shipped it home in a very large box!  It's a different kind of design, with a handle for moving the unheddled threads up and down.  I think it also is a pretty loom, the design is elegant looking.

Here it is warped for an Inkle Loom Round Robin in Memphis last weekend.  I like to use the clamps to keep the looms from moving around when I weave, which they all seem to do. 


Here is a second (guild) loom I warped for the round robin.  This is how I deal with all the ends when there are a lot of color changes.

 
After the warping is finished, the thread ends are tied together while checking the warp threads for even tension.
 
 
We wove 14 different bands during the workshop / round robin! 


Left to right:

Warpwise Stripes, this was actually woven on the floor loom!  Without the reed / beater.

Crosswise Bars, an easy, fun design.

Checkerboard.  The thread is 10/2 perle cotton, and the checks are subtle because the thread is very fine and the colors do not contrast much, but it is real pretty close up!

T-Bars.  Another design that is simple to warp but makes an interesting design.  3/2 perle cotton was used.

Chains.  This beautiful bookmark was made with crochet cotton #10.  I love the weight of it and the smoothness of the thread, and the colors Patricia chose are so pretty.  I just received the new Knit Picks today, and page three has crochet cotton #10 in 20 colors!!  Click here to see Knit Picks 'Curio' Crochet Cotton.  And here to link to a mini tutorial about using this new Curio Crochet Cotton.

Hmmm, let's see, 20 colors at $3.99 each......  I think I need them all!!  Great for Irish crochet, too.

Back to the bookmarks....

The next is Flowers, in two color ways, using cotton rug warp.  'Flowers' was the pattern assigned to me, and since I had two looms at home (Carolyn's and one belonging to the guild), I decided to warp them both in two different color ways.  Thinking 'granny square afgan,' I warped one with a background of black and flowers in deep magenta, purple and rust.

The second Flowers I warped in a light green background with flowers of rose, yellow and lavender, with black centers. 

Rainbow.  This bookmark was made from 120/2 silk from Red Fish Dye Works.  It was hard to work on because it was quite narrow.  I had trouble seeing it, so my edges are a true mess!  I think it would be fun to try this very fine silk again, but wonder if you could put several (10?) strands through each heddle to make it wider/thicker?


Stars and Stripes, 5/2 perle cotton.  I'm not a flag waver, but this was fun to make!  And I learned how to do a clasped weft, using blue on the left selvedge and red on the right, so the edges match the color next to them.  Good technique to know.

Rep Weave.  Ok, my sample does not look very good, but this is a very interesting technique.  I stayed overnight at Angela's, and she has made several beautiful art pieces using this technique.  It kind of makes me think of trapunto, with the thick yarn woven in.  I would like to explore this technique more.  In different colors.

Beaded Edges.  Of course I loved this technique, adding beads to the edge of the trim.  A supplementary warp is threaded with beads, unheddled, and weighted and hung over the top of the loom.  The beaded warp is carried along, or set aside for a number of picks, depending on the design.  This technique was a bit difficult to figure out, but once I got the spacing down, it was pretty straight forward.  And I want to explore this technique a lot more!!  Passamenterie too!

Tubular Weave.  This technique is easy, and you almost don't need to think about it once you get going.  When you take it off the loom, the tube naturally wants to twist, so you get a nice spiral effect on the tube.  I can see this would be a fun technique for jewelry making.  But I still love my kumihimo braiding!

Krokbragd.  This technique was really interesting.  And hard!  Three sheds (instead of the normal two) are used, so an extra set of heddles are added to the loom, plus a shed stick.  The weavers in the group commented that it was very fun to learn, but this type of design would be easier done on a regular loom!

Baltic Style Pickup (far right, above, and below).  Wow, this was really, REALLY fun to do.  But it was hard, too.  Although once you figure out what you are doing (it took me about 6 - 8 rows), it all makes sense.  You just have to really pay attention to your graph to pick up and/or pick down the correct warp threads.  The background was linen, and the pattern was in wool, and these fibers want to stick together each time the shed is changed, but the wool stands out very nicely from the background.  I love my bookmark and want to explore this technique a lot more.


After we finished weaving our samples, they were cut from the looms and the techniques discussed.  My loom, with handle for lifting up or pushing down unheddled threads, was considered.  Roni, below, and the rest of the group thought it was a very good design, except that when you are moving the heddled threads with the right hand, you have to reach over to operate the handle.  And Patricia said she missed the tactile experience of pushing down and pulling up the warp threads with her fingers.

 
Before we took it off the loom, we moved the heddles to another dowel, as I thought I had put them on the wrong dowel (see first picture of this loom above).  They worked much better on the lower dowel!  It took me about four attempts to warp the loom, as I had not taken a photo of it warped at Carolyn's house. 
 
 
Here Angela explains Baltic Style Pickup, and how to graph out your own design.  She demonstrated that it is best to graph your pattern (foreground design) where the warps are normally up or down (I think!).  The two-day workshop / round robin was really fun, and we all learned a lot.  Angela is a great teacher, and a mentor to many new weavers.  Thanks, Angela!


Bonus!  On Sunday morning (workshop didn't start until 1:00), Angela got out her basket supplies and showed me how to make a 'jelly bean' basket.  Here are several colorful baskets she has made (the reeds are space dyed), and my little crooked basket sitting in another basket.  I'm going to try making more, using Rit dye to color the reeds.


Mac helps with my photography......


I love the inkle loom!  When I took the beginner workshop in April, I thought I would just try it to learn something new, but that I wasn't going to buy a loom or pursue it any further.  Of course, one hour into the workshop I was hooked!  There are so many different patterns to try, and the finished bands can be used for so many things (bookmark, hat band, dog collar, guitar strap, belt, purse strap, clothing trim, etc.).  It's also pretty easy to warp the loom, and portable!


Monday, June 24, 2013

EASY (and cheap) COILED BASKET

We added coiled basket instruction to our recent fiber camp.  Success was limited!  The project might be just a tiny bit advanced for 10 year olds, although my 10 year old tester caught on to it pretty quickly.  I have tried several basketry techniques, and I think coiled basketry may be one of the easier types of baskets to create. 

Last week I taught the same technique to a group of adults at the public library.  It takes a bit of finessing to get a coiled basket started, but once you get to about the third row, it is really easy, and something you can work on while watching tv, or with your crafting group, etc.

Here is a photo of the four coiled basket samples I made for the class. 

 
For these baskets I used cotton clothesline from the hardware store and inexpensive yarn (acrylic) found at fabric and craft stores.  The largest basket, 1 1/2" tall x 4 1/2" across at the top, used 10 feet of clothesline and about 30 - 40 yards of yarn.  I used a #18 tapestry needle (DMC) to make the stitches. 
 
These little baskets are quite firm.  I take a stitch after about five wraps, always pulling tightly, on the stitch as well as the wraps. 
 
Because coiled basketry is made in a spiral, it is difficult to end it perfectly!  It is a good idea to finish the coiling directly above the place where you start gradually bending the sides upward.  I also cover the end with buttona, or a piece of costume jewelry, or even a shell (as in the basket on the lower right).  You can use glue to add the decoration, or clear nylon thread, which is how I attached the shell.
 
The coaster, lower left, was made with a cotton yarn, and works very well as a platform for an ice cold drink.
 
Click here to link to my directions to make a coiled basket.


Tuesday, April 2, 2013

An Artist and a Scientist

Maria Sibylla Merian (b. April 2, 1647; d. January 13, 1717.)

Whom I had never heard of, until I went to Google this morning and saw today's Google Doodle:

Which led me to an informative article in the CSM (found here).

Which led me to want to look at more of her work.  I found a wonderful site with all sorts of pictures here.

Here's my favorite (so far!):


See the tiny baby lizard in the bottom right corner?!?

There are so many things I find amazing about her life and work - she was painting and publishing her work in the late 1600's, she traveled to Suriname with her daughters to paint at the dawn of the 18th century, and she helped change scientific thinking about insects (the focus of much of her work).  Wow.

Thanks Google!

Monday, April 1, 2013

At last....

Whatever happened to my wee doggie?  She's been done for ages I'm afraid, but as the school year wound down, so did I.  After 3 weeks of sleep I'm ready to get back into some fun things and finish up this post.  The last bits were attaching the ears and completing her face.  So, onto the ears!  Here she is with the first one in place:


I decided to vary a bit from Gretel Parker's ears - I realized that I was modelling this after my real dog (also named Sadie) and, well, she's got really big pointy ears.  Like bat big.  And very expressive - she can do a 360 with those ears, no problem.  The construction might be a bit unusual, but it worked well for the first ear, so I replicated it for the second!  In creating this shape I started with a long piece of roving:


Which I then folded in half and used the green 5-needle tool to begin felting:


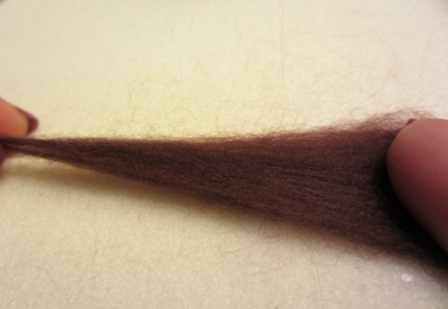
I noticed that the ear was getting "fuzzy" on the edges while I felted.  To tidy this up a bit I stretched the piece of roving slightly between my two hands every few moments, like this:


After a few punches with the green 5-needle, I moved to the pink 3-needle to continue shaping it up.

AND...an 8 month blogging hiatus later - poor Sadie, she's been done since last summer.  Must...blog...regularly.  

I need to finish this story before I can share my latest work, so here we go...picking up right where I left off!


I couldn't get a picture of this - not enough hands - but I started turning the ear on its side to create the indented area between the felted and unfelted sections.  At first I had thought that I would use the loose, unfelted bits to the right to attach the ear to the head.  But Sadie's ears were much pointier that this, so I decided to try something different...sometimes having no training in a craft is actually helpful - if there are any "rules" you don't know what they are, so you feel free to try whatever works!

I turned the ear around, and peeled sections of the unfelted wool down over the ear like so:


And then started felting those bits in place - there's the pointy ear that I was looking for!


Then it was dead simple to use the bits of fluff on the left to attach the ears to her head.  I used a few wispy strands - maybe a dozen fibers worth (!) to smooth this area a bit, so that the ear attachment point wasn't obvious.


On to Sadie's nose - I found this part difficult.  The Mollie Makes project of Gretel Parker's that inspired me had a much more defined nose - a nice triangular shape too - but I don't think I've quite developed the control to deliver that just yet.  So I did this instead:  attached a piece of black fiber about 3 inches long in the center of her snout...


And then I kept wrapping the fiber in a counter-clockwise direction around the center attachment, and tacking it down with the needle!


Next step - eyes.  I didn't have any of the plastic eyes that I wanted (I hadn't figured out how to source those yet), but I did have a little tin of faceted hemetite beads that worked just fine!


Gretel used a lovely little beret to hide the strings for attaching the eyes - I covered mine with a purple collar instead!


All she needed was a cute little tongue (Sadie is a very kissy dog!).


Sadie sits up on my crafting desk now...


...just next to my next felting endeavor: this chubby hippo baby!


This was the inspiration picture that I used - it's not a bad start!

Monday, March 18, 2013

Kanzashi Blooms!

I found a really cute book lask year on making a Japanese style fabric flower, 'Kanzashi in Bloom,' by Diane Gilleland.  Three types of petal instructions are given (round, pointed, and pleated), and the book has many projects for using the blossoms for jewelry, hair ornaments, fashion accessories, and even home decor items such as drawer knobs and a tea cozy.

Diane also has a very colorful craft blog, called CraftyPod (click here to go to CraftyPod), which has lots of craft tutorials, inspiration to get your crafty going, and information about the book, Kanzashi in Bloom.

I gave a demonstration on making Kanzashi blooms to my EGA chapter last week, and here is a picture of the pins we made.  They are very colorful!  See the cute lady bug pin on Susan's green flower?  She sewed the button on in a way that gave the lady bug antennae.   Please note the tiny bloom on the right, it's actually a ring to go with my pin.  Tiny blooms are a challenge to make.  Cotton is the best fabric to work with, as you can finger press the folds and the shape will hold well.

Friday, March 15, 2013

More Fiber Camp Pictures

During Fiber Camp 2013, to be held at Sit N Rock Quilt and Sewing Shop June 3 - 7, we will explore embroidery stitches.  We will work on a sample piece to learn the stitches.  In the photo below I have used part of a colorful fabric I found at Sit N Rock, 1502 West Jackson Avenue (662-234-0800, info@sitnrock.com).

After a little practice we will create a small needle book to store needles we will be using during Fiber Camp 2013 (embroidery, tapestry, etc.)  Using the correct needle for each fiber project is a must for good results, and this is a good way to keep the needles organized.  You can right click on any picture for a larger view.


Detail of the embroidery stitches: Running, Stem, Long Cross Stitch, Chain, Lazy Daisy, Fern, French Knots, Buttonhole, Chevron, Couching, etc.  Most of the stitches are basic and easy to learn. We will learn several of the basic stitches, and, time permitting, go on to the slightly more advanced stitches.

Front of the Needle Book, which is made from wool felt.  The butterfly design is from another fabric which is all butterflies.  Iron-on fusible adhesive adheres it to the cover of the book and it is then embroidered.

Back of needle book and interior.  The butterfly fabric on the inside covers up the back side of the embroidery stitches, then a little book is made with 8 pages to store various needles.

To register for Fiber Camp, please call Sit N Rock, 662-234-0800.

The next post has several more photos of Fiber Camp 2013 pictures.

Sunday, March 3, 2013

FIBER CAMP 2013 !

I am offering a Fiber Camp for children ages 9 and up this summer from June 3 - 7, to be held at Sit N Rock Quilt and Sewing Shop, 1502 West Jackson Avenue in Oxford (662-234-0800, info @sitnrock.com)  My assistant and I will be teaching weaving, felted beads, embroidery, basketry and braiding techniques.  The camp is from 9 - 5 each day, and all materials are included in the fee, which is $225.  (We are offering an early registration discount of $200 for the week, before May 1st.)

A guest artist will teach spinning on the wheel as well as drop spindle.  Besides the small weaving project (below), one or two table top looms will be set up for weaving throughout the week, making mug rugs on a rigid heddle and four shaft loom.

Here are some photos of what we will be teaching.  More photos to come!

Weaving


 Felted Beads (and embroidery on the beads)

 Basketry

 Coiled basket in progress

Kumihimo Braiding, necklaces and bracelets 

 Macrame Choker Necklaces

To register for Fiber Camp, please call Sit N Rock, 662-234-0800.