Showing posts with label Felted Toys. Show all posts

Monday, April 1, 2013

At last....

Whatever happened to my wee doggie?  She's been done for ages I'm afraid, but as the school year wound down, so did I.  After 3 weeks of sleep I'm ready to get back into some fun things and finish up this post.  The last bits were attaching the ears and completing her face.  So, onto the ears!  Here she is with the first one in place:


I decided to vary a bit from Gretel Parker's ears - I realized that I was modelling this after my real dog (also named Sadie) and, well, she's got really big pointy ears.  Like bat big.  And very expressive - she can do a 360 with those ears, no problem.  The construction might be a bit unusual, but it worked well for the first ear, so I replicated it for the second!  In creating this shape I started with a long piece of roving:


Which I then folded in half and used the green 5-needle tool to begin felting:


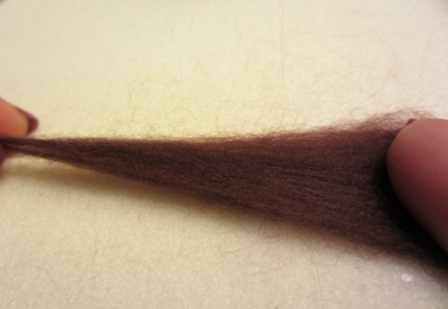
I noticed that the ear was getting "fuzzy" on the edges while I felted.  To tidy this up a bit I stretched the piece of roving slightly between my two hands every few moments, like this:


After a few punches with the green 5-needle, I moved to the pink 3-needle to continue shaping it up.

AND...an 8 month blogging hiatus later - poor Sadie, she's been done since last summer.  Must...blog...regularly.  

I need to finish this story before I can share my latest work, so here we go...picking up right where I left off!


I couldn't get a picture of this - not enough hands - but I started turning the ear on its side to create the indented area between the felted and unfelted sections.  At first I had thought that I would use the loose, unfelted bits to the right to attach the ear to the head.  But Sadie's ears were much pointier that this, so I decided to try something different...sometimes having no training in a craft is actually helpful - if there are any "rules" you don't know what they are, so you feel free to try whatever works!

I turned the ear around, and peeled sections of the unfelted wool down over the ear like so:


And then started felting those bits in place - there's the pointy ear that I was looking for!


Then it was dead simple to use the bits of fluff on the left to attach the ears to her head.  I used a few wispy strands - maybe a dozen fibers worth (!) to smooth this area a bit, so that the ear attachment point wasn't obvious.


On to Sadie's nose - I found this part difficult.  The Mollie Makes project of Gretel Parker's that inspired me had a much more defined nose - a nice triangular shape too - but I don't think I've quite developed the control to deliver that just yet.  So I did this instead:  attached a piece of black fiber about 3 inches long in the center of her snout...


And then I kept wrapping the fiber in a counter-clockwise direction around the center attachment, and tacking it down with the needle!


Next step - eyes.  I didn't have any of the plastic eyes that I wanted (I hadn't figured out how to source those yet), but I did have a little tin of faceted hemetite beads that worked just fine!


Gretel used a lovely little beret to hide the strings for attaching the eyes - I covered mine with a purple collar instead!


All she needed was a cute little tongue (Sadie is a very kissy dog!).


Sadie sits up on my crafting desk now...


...just next to my next felting endeavor: this chubby hippo baby!


This was the inspiration picture that I used - it's not a bad start!

Sunday, May 13, 2012

Shake a Leg! (Silly...)

Well, after much delay here is the next step in my little dog!  I thought I would try and show detailed steps of the process I took to attach her second leg.  Yes, she's a girl.  Her name is Sadie.

For the leg I used about this much roving:


Which I then folded in half...


And used the Green 5-needle tool until it looked something like this...


I found it helpful to keep rolling and folding the fiber to get it to compress into a leggish shape!  Afterwards, I used the Pink 3-needle tool to shorten the length by inserting the needle at an angle into the leg, like so:


Here is a snap showing the size of the leg just before I attached it, as compared to the finished other leg:


It made sense to leave the leg just a little bigger, since you compress it more when attaching and shaping it.

So, I positioned the leg...


And used the Pink 3-needle tool to attach it at the back end:


Once I had the leg stuck on at the back, I decided that just one needle would give me the detailed control to shape the leg (I still think it's amazing that you really can stick on a single piece of wool at a time!), so I decided to remove a couple of needles.  You do this by unscrewing the white collar from the back of the pen to reveal the needle compartment:


Then you can just slide the extra needles out one at a time -


...and get to work shaping up the leg!


So, now she has two legs!  She is all finished actually, and I will put up the rest of the process is another post (hopefully later today).

A Happy Mother's Day to all Moms out there - and especially to my mom, and aunt.  The women I share this blog with constantly set an example for me of the way I should try to live my life - be happy, be encouraging, work for the things you believe in, do what you love and CREATE!  Sounds like a marvelous plan!  xoxo

Sunday, April 29, 2012

Mollie Makes Me Needle Felt!

My mother has introduced me to a wonderful crafting magazine - Mollie Makes. It is published in the UK, and not always easy to come by here. Luckily, it is available as a digital edition on my iPad - the picture quality is great and you can zoom in to see the tiniest details. The moment I saw the most recent issue's cover


I knew I had to make one of the adorable felted dogs. Because, 1) you can never have enough crafty hobbies, and 2) I already have a lifetime's supply of roving (thank you Etsy) just waiting for me to find new and creative ways to use it up!

Any excuse to shop for new supplies will do - after poking around on Amazon and doing a bit of research on Ravelry, I decided on the following three items:


The mat is a Green Soy Needle Felting Foam Mat from Mielkes Fiber Arts - HIGHLY recommended. Eco-friendly and a super smooth finished piece! I also tried the bristly mats from Clover but I noticed that the fiber sticks to it like mad, and it creates a lot of "fuzz" on the outside of the felted piece. I think the Clover Mats would be great for applique felting though! The needle felting tools are both from Clover, and are perfect. I use the green 5-needle tool when I'm getting started - when the fiber is still very loose and before the real shaping begins. The pink 3-needle pen is perfect for the detail work - fine shaping and attaching bits - it is also dead easy to remove a couple of the needles and turn it into a 1-needle pen. So, here is my wee little doggie, under way:


He's a bit squidgy on the inside still - like one of those molten cake desserts - but if I firm it up much more he's going to get teenier and teenier.  Maybe this is normal for needle felting?  Anywho, still one leg to go!


And ears...Mini Photo Tutorial on these to follow! I'm amazed at how fun it is, and how quickly I've become just a little addicted. Sculpting, as an art form, has always looked impossibly daunting - the talent involved in seeing a finished work inside a lump of raw material, be it stone or clay or fiber. This little dog is designed by Gretel Parker and she has a wonderfully sweet and whimsical sensibility, and clearly a great deal of talent.  So thank you Gretel and Mollie for pointing me in a new direction!