When you get a good one, make a hole in the bottom with a utility knife, whirling the point around until the hole is big enough. Be careful; if you are working with a child this part should be done by an adult.
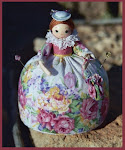
The hole may not be perfectly round, or centered. That’s ok, it just needs to be big enough for the pipe cleaner neck to fit. And if it is not centered, the doll’s head can tilt quizzically. Miss Hickory was a curious little doll!

Drop a blob of glue into the hole in the hickory nut, and push neck gently into hole. (Hickory nuts can be quite fragile.) Let dry thoroughly.
Take apart tiny fabric flowers. Apply glue in a ring around head and attach flowers. Let dry thoroughly, then glue some beads into the flower centers. Repeat on tops of shoes.
Maybe I shouldn’t, but I always leave the face painting for last. It seems that the doll tells me what kind of face it should have only after it is completely dressed.
Because hickory nuts are somewhat dark, you will have to apply white paint for the eyes, in an oval. I used an acrylic paint. When dry, the rest of the face painting is done with Micron Pigma Pens, both .005 and 1.0 sizes, in black and colors. Quilt shops and art supply stores usually carry these. Let face dry completely.

Pose Miss Hickory with her book. When you are reading the book to children, you can pass the doll around for them to hold while listening, imagining…..


Got here from Salley's facebook page. I've never heard of Miss Hickory, but I'm going to check the book out. Your little doll is darling.
ReplyDelete