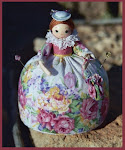
 Run a gathering thread at the waist near the edge (approximately 1/8”). Pull up thread, fit slightly below dolls waist, and tie off. Add a little glue there to hold in place. Let dry. Add a second layer of petals in the same way, this time at waist level.
Vest. Lay doll on a piece of paper towel. Draw around the bodice to make a pattern, adding an extra ¼” or more to make it fit around the body. Cut two matching pieces from the paper towel. Try your pattern on the doll, pinning at sides and shoulders. (You can pin it right to the doll, it’s too hard to try to pin the seams together!) You may have to adjust the pattern a couple times to get the fit right. When the fit is correct, cut two matching pieces from good quality felt.
My messy desk:
My messy desk:

Embroider a couple flowers on the front of the vest, using one strand of floss and the lazy daisy stitch.

On all the edges that will not be seamed, I make a decorative buttonhole stitch, using one strand of floss. Do this before you sew the front and back together. Sew the shoulders and one side seam together with a small overcast stitch. Put the vest on the doll and sew the remaining side seam while the vest is on the doll.

Next, the head and accessories (hat and shoes).


No comments:
Post a Comment