Showing posts with label Dolls. Show all posts

Wednesday, September 5, 2012

Inspired by Native American Artisans


On my trip Up North this summer, I was lucky enough to see three museum exhibits featuring the art and craft of Native American artists. The pictures that can be made with tiny beads, porcupine quills, and moosehair is amazing. I’ve done a lot of beadwork, using Indian techniques, but I would love to try my hand at things like moosehair embroidery. (I wonder if all the saved cat whiskers might work in this technique. I've saved a LOT of them over the years!)


Carolyn and I went to a really good exhibit at the Berkshire Museum in Pittsfield, called Rethink! – American Indian Art.    The exhibit is up until January 6, 2013, and includes the work of well known contemporary artists such as Teri Greeves, click here and here; Jeremy Frey; Marcus Amerman, and many others.  

Note: You can click on any text that is in dark red, to follow a link to another website.

I love Teri Greeves’ Beaded High Top Sneakers. What a hoot! Teri is teaching a Beaded Baby Moccasins workshop at the museum on November 4. Wish I could take it!
 

There were several wall hangings by Teri Greeves that were really interesting. This bead technique looks similar to working with number 11 seed beads, but she used BIG beads and on a large scale.


I have been seeing Marcus Amerman’s beaded portraits for many years (see Chief Joseph portrait here), but I did not know about his high fashion pieces and glass work.  I love the beadwork lapels on this 'Indian Tux' (my description, I do not know the title of this piece).  The jacket in the background was also fascinating, all done in a beadwork version of ledger drawings. 


The Berkshire Museum will also host workshops this fall with Jeremy Frey (an amazing Passamaquoddy basket maker), October 7, and Niio Perkins, ‘Iroquois Beaded Whimsey’ on December 4.


The exhibit at the Berkshire Museum also features artifacts the Museum has collected over the years.  I love this sweet European China doll beautifully dressed in Crow costume:


Visiting Kathy in New York City, I discovered TWO museum exhibits featuring Native American art! Of course I always go to the National Museum of the American Indian in New York, now located in the Wall Street area, but I used to go to it when it was up in Harlem and was called the Heye Foundation Museum of the American Indian. The NMAI has some amazing, amazing pieces in their collections, and there are always new exhibits up when I visit. This time it was DOLLS!

There were some beautiful, and charming, dolls in the exhibit. The lighting was low, and no flash, so the photos aren’t great, but you can see the NMAI doll collection online by doing a search (and you can see the BACK of the dolls too, which I couldn’t in the exhibit).   Click here. 

One of several ‘dolls’ by Joyce Growing Thunder:


I like the face painting on these dolls:


These dolls were from Alaska, are made of grasses, and I think they are a kind of basketry:


The exhibit is now closed, but there is a catalog, sort of. It doesn’t feature the dolls in the exhibit, but it is an excellent book about Native American dolls.
Order it from the museum store:

Anishinaabe Birch & Quill House:


Cool!  A Choctaw coat (circa 1900) from Mississsippi!  This was part of another exhibit, "Infinity of Nations," at NMAI, and in additional to the actual exhibit, there is a fabulous online exhibit of Native art of the Americas, from earliest history to contemporary.


More Inspiration Pieces!

After visiting the NMAI, and a bite to eat from a cute little Farmer’s Market in front of the Custom House,

we head up to the Metropolitan Museum for yet another exhibit of Native American art & craft.  These items are from the The Coe Collection of American Indian Art, and are on exhibit through October 14. 
 
(Photography allowed, no flash.)  Here is Joyce Growing Thunder again!. This ‘doll’ was incredible, the design and workmanship are so exquisite. And this time I got to see the figure in the round, as well as the inspiration pieces that inspired the work!
Here is the inspiration piece that inspired Joyce Growing Thunder's figure, front and back.  It is a Girl's Cape, Assiniboin, from 1890-1905.


You can search the Metropolitan online data base for photos and information about museum objects and collections, including Joyce Growing Thunder: 
 
I love the internet!  It is wonderful for people like me who live hundreds (and thousands) of miles from the large museums.  To search the Museum's online data base, click hereTry looking up 'dolls' and see what comes up, it's amazing.  There are so many objects in a museum's collection that are not currently on display which you can see online.
 
I did a search “beadwork in the coe collection” and found lots of beautiful pieces to study, including this Iroquois Glenngary style cap.  I want to make one of these.

Lastly, I love this figure in the Museum.  I’m afraid I do not know what it is, but I call it “Curmudgeon Baby,” because that is what it looks like to me!  Cute Curmudgeon Baby.

Tip for visiting the Metropolitan Museum.  The recommended fee for admission for adults is $25 (seniors $17).  When my daughter and I visited we arrived later in the afternoon.  I asked if I could pay less, as we would only be there less than two hours, and they said we could pay an amount of our choosing, so I paid less than the suggested amount.  But if I had been able to spend all day at the museum, $25 is a bargain for what you get at this BEST art museum in the U.S.!

Friday, May 7, 2010

Miss Hickory Doll, Pattern, and Instructions


When my daughter was young we read, several times!, a wonderful book called Miss Hickory by Carolyn Sherwin Bailey. It was a Newberry award winner in the late 1940's, I think. The story is about an independent minded little doll, made from a hickory nut and applewood twig, who must fend for herself when the dollmaker and her family leave cold New Hampshire and go 'south' to Boston for the winter. Though she is independent and feisty, Miss Hickory learns to gracefully accept help from crow, squirrel, cat and other friends.

It took me 35+ years, but at long last I have created a Miss Hickory Doll! I think she matches pretty well the charming book illustrations by Ruth Gannett and the spirit of the character portrayed by Carolyn Sherwin Bailey.


In the next several posts I will give instructions for making your own Miss Hickory doll. But, you must read the story first!! That will surely influence your characterization of the doll.
Thanks to Salley Mavor for allowing me to present my version of a type of doll she has been making for many years. Salley has illustrated several children's book with her "stumpwork" fabric art, as well as presenting patterns and instructions for her charming little "Wee Folk" dolls.

Miss Hickory - Pattern & Instructions - Part 1

The doll's skeleton is made from four 6" pipe cleaners (which I find in, cough cough, tobacco and cigar shops; they are also sometimes generous with nice wooden cigar boxes!). One 6" cleaner forms the neck and bodice. A second one forms the two arms. Two more pipe cleaners form Miss Hickory's somewhat tall and lean legs. Measurements are given in the illustration below. (You should be able to click on it to enlarge.)


Loosely form the skeleton following the measurements above. The shoulders to the thighs will be firmly covered with bias tape, which will fill out the bodice and hold the pipe cleaner skeleton together.

Glue (Tacky glue is used on all parts of this project) the end of a long piece of bias tape to the back of the pipe cleaner torso just under the shoulders. Wrap the shoulders and torso with the bias tape, then the upper legs, then the torso again. Cut and glue the end on the back. This bias tape will not show under Miss Hickory's costume.


Hickory nuts come in a variety of shades of brown. I try to match the embroidery floss and bias tape to the color of the hickory nut. (See Part 4 for the hickory nut head, which goes on last, after all the clothes have been fitted and applied.)

Miss Hickory - Pattern & Instructions - Part 2

Glue end of a long piece of embroidery floss to the back of the bodice. After that dries, spread a small amount of glue on back of neck and wrap the floss up and down the neck (glue holds wraps in place). When you get to the shoulder area, spread a thin layer of glue on the front of the bias tape. This is important to keep the wraps smooth.


After shoulder is finished start wrapping one arm. Wrap all the way to the tip. Bend hand back about ¼” and wrap back up the arm. (See TIP elsewhere in the instructions.)

Remember when you are wrapping that Miss Hickory is made of an applewood twig, so her limbs will be skinny. Extra wrapping is not necessary. Unevenness and bumps, like a twig, are ok too!

Repeat on second arm, wrapping up to the tip, forming hand, and back to the top of arm. Glue floss to back of bodice, wait until it dries, and carry the floss down to the legs, just below the bias tape. (If it is easier for you to work with shorter lengths of embroidery floss – I work with the whole skein – you can wrap the top part of the doll, then with another piece the lower part of the doll.)

Wrap the embroidery floss down one of the legs to the ankle, about 1” from the end, then back up the leg and over to the other leg. Repeat, cut floss, and glue.

To make socks or boots, glue end of a different color of embroidery floss to the back of the lower leg. Start wrapping the new floss ½” above the ankle, over the lower part of the already wrapped leg. This makes it really look like socks or boots. Change the color another time to make the shoes a different color still.

Bend the tip of the covered pipe cleaner back about ½” to form the foot. Wrap back up the foot and lower leg. Put a dab of glue on the back of the leg where the ‘sock’ ends. When glue is dry, cut the extra floss. The lower leg should look something like this:

Miss Hickory - Pattern & Instructions - Part 3

Clothing for Miss Hickory. For the skirt, take a fabric flower apart. (Daisy-like flowers with many petals seem to work best, fewer petals need a little finessing.) Cut into the center of one of the layers of petals. You will also need to cut the hole bigger, to fit the doll’s waist.

Run a gathering thread at the waist near the edge (approximately 1/8”). Pull up thread, fit slightly below dolls waist, and tie off. Add a little glue there to hold in place. Let dry. Add a second layer of petals in the same way, this time at waist level.


Vest. Lay doll on a piece of paper towel. Draw around the bodice to make a pattern, adding an extra ¼” or more to make it fit around the body. Cut two matching pieces from the paper towel. Try your pattern on the doll, pinning at sides and shoulders. (You can pin it right to the doll, it’s too hard to try to pin the seams together!) You may have to adjust the pattern a couple times to get the fit right. When the fit is correct, cut two matching pieces from good quality felt.

My messy desk:


Embroider a couple flowers on the front of the vest, using one strand of floss and the lazy daisy stitch.


On all the edges that will not be seamed, I make a decorative buttonhole stitch, using one strand of floss. Do this before you sew the front and back together. Sew the shoulders and one side seam together with a small overcast stitch. Put the vest on the doll and sew the remaining side seam while the vest is on the doll.


Next, the head and accessories (hat and shoes).

Miss Hickory - Patterns & Instructions - Part 4

Miss Hickory’s head, face and accessories. Collect a bunch of hickory nuts. Let them dry in the sun, then peel off the outer shell. I say collect a bunch because they won’t all work. Sometimes you can’t get the outer shell off, or they may be stained, or too fragile.

When you get a good one, make a hole in the bottom with a utility knife, whirling the point around until the hole is big enough. Be careful; if you are working with a child this part should be done by an adult.

The hole may not be perfectly round, or centered. That’s ok, it just needs to be big enough for the pipe cleaner neck to fit. And if it is not centered, the doll’s head can tilt quizzically. Miss Hickory was a curious little doll!


Drop a blob of glue into the hole in the hickory nut, and push neck gently into hole. (Hickory nuts can be quite fragile.) Let dry thoroughly.

Take apart tiny fabric flowers. Apply glue in a ring around head and attach flowers. Let dry thoroughly, then glue some beads into the flower centers. Repeat on tops of shoes.

Maybe I shouldn’t, but I always leave the face painting for last. It seems that the doll tells me what kind of face it should have only after it is completely dressed.

Because hickory nuts are somewhat dark, you will have to apply white paint for the eyes, in an oval. I used an acrylic paint. When dry, the rest of the face painting is done with Micron Pigma Pens, both .005 and 1.0 sizes, in black and colors. Quilt shops and art supply stores usually carry these. Let face dry completely.


Pose Miss Hickory with her book. When you are reading the book to children, you can pass the doll around for them to hold while listening, imagining…..

Monday, May 11, 2009

More AFIC

Here are some of the amazing dolls that were on exhibit at Artistic Figures in Cloth:


This is another doll by my teacher, Allison Marano. This one is called "Tarin." Please visit Allison's website to see more of her figures. They seem to capture perfectly a moment in the fleeting life of a fairy, pixie, or elf.
Below are two dolls by another instructor, Susan Barmore, "Joeie" and "Treesa."
Both Allison and Susan were instructors at AFIC. It is very hard to choose which class to take! Susan's 'folk art' figures and dolls are really different, and beautifully painted in a primitive/modern kind of way.

Inez Brasch was standing next to her figure, "Morrigan," when I stopped to look at it. Her name rang a bell with me immediately. I remembered seeing a doll grouping at the last doll conference I attended, more than ten years ago, with her name attached to it. Inez explained to me that Morrigan is an Irish folklore figure who takes care of the dead. It is hard to see it in this small picture, but Morrigan has a very beautiful, serene face. There are better photos on Inez's Picture Trail.

Artistic Figures in Cloth

Allison Marano, "Grapevine Girls"

I recently attended the Artistic Figures in Cloth doll conference in Columbus, Ohio. I haven't been to a lot of doll conferences, but this has to be one of the best ones. Cindy Sieving and her staff were so well organized about all parts of the conference -- workshops, exhibits, vendor's, opening banquet, hotel accommodations, etc. Even the food was delicious! -- lots of fresh vegetables, fruits, etc. It was great fun, and I took a wonderful workshop with Allison Marano of Faewyck Studios in Erie, PA. We learned how to make the tiniest, graceful fingers, and many other great techniques.

The opening banquet was a lot of fun (even tho' our table was the last to go up to the buffet, no chocolate dessert left!). We worked on round-robin doll pins for each person to wear during the conference, with only 7 minutes to add something to each doll as it moved around the table! There were some amazing hats worn, as the theme of the evening was "Hats & Heels." When I get the CD from the conference I will post a couple photos of the hats.

My roommates, Pat & Mary Ellen, were super. I was happy to learn that they weren't night owls, but I think we all had a little trouble sleeping because you get really excited and energized being surrounded by so much talent! We had little mini workshops in our room, Mary Ellen showed me how to make fabric beads, and Pat makes interesting cording out of artistic wire.

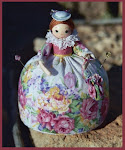
I brought some Pin Poppet kits to the conference. Wasn't sure any would sell, as the design is kind of traditional, and sweet, and contemporary doll makers are creating some pretty wild and innovative designs these days. But I did well and almost sold out of my kits and Pin Poppet patterns. I used to teach the design in workshops, and provided a kit for my students, but I am retiring the kits for good and will only make a few Pin Poppets to order or for guild raffles, etc.

This Navajo Pin Poppet was made for one of the raffle baskets at my sister's guild fashion show a couple years ago. And the one below was made for a friend's daughter's school raffle.

The little (3 1/2") pincushion doll has a needlecase inside, and the doll comes apart at the waist. A good place to store those precious, specialty needles.

Here I am painting the faces on almost sixty little doll heads. Phew!

Friday, April 3, 2009

Fascinator, Part 4 - The Dolls

"Lulu's Garden" Fascinator with Flowers, Arbor, and Garden Visitors

Lulu always had such wonderful flower gardens. I remember, in early Spring, just laying on the ground in front of the flower beds, taking in the heavily scented hyacinths. We also had three large lilac bushes around our house. And mock orange! Perfume filled the air!

But I digress. The theme for the hat, "Lulu's Garden," necessitated little people enjoying the garden. So I made little dolls to sit and walk through the garden, sort of representing my sister and me.
The dolls were made with 32 ga. florist's wire, but next time I would use Artistic Wire. I had fits trying to get the bead 'hands' and 'feet' onto the florist wire because the thread kept bunching up, even after applying Tacky Glue to the ends. This wouldn't be the case with Artistic Wire, and it also comes in lots of wonderful bright colors, and several gauges. I have used florist wire in making other tiny dolls and it works very well, especially when you are wrapping with thread to build up the anatomy (examples below). 


(Directions for these tiny dolls in a future post.) But for the above dolls, to place on the hat, I kept the design very simple. Here is a diagram for assembling the doll:


And for the skirt, which is just a piece of painted buckram (the skirt on the second doll is a piece of pleated ribbon):


Detail of the hat and doll with pleated skirt. Oops, I think I already included this photo in my last post. Here it is again!

The hat does not just sit and stay put on top of the head. Fasten a length of narrow, round elastic at either side of the hat. This elastic is placed on the back of the head, under the hair. You then have to fiddle with the hair next to the hat, so the elastic doesn't show.


I didn't have the guts to wear the hat at my sister's guild fashion show, but I'm pretty sure I will wear it at the Artistic Figures in Cloth opening banquet since the theme is "Hats!" I know those dollmakers will be wearing some pretty far out chapeaux and I'll be in excellent company!