Friday, May 7, 2010

Miss Hickory Doll, Pattern, and Instructions


When my daughter was young we read, several times!, a wonderful book called Miss Hickory by Carolyn Sherwin Bailey. It was a Newberry award winner in the late 1940's, I think. The story is about an independent minded little doll, made from a hickory nut and applewood twig, who must fend for herself when the dollmaker and her family leave cold New Hampshire and go 'south' to Boston for the winter. Though she is independent and feisty, Miss Hickory learns to gracefully accept help from crow, squirrel, cat and other friends.

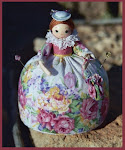
It took me 35+ years, but at long last I have created a Miss Hickory Doll! I think she matches pretty well the charming book illustrations by Ruth Gannett and the spirit of the character portrayed by Carolyn Sherwin Bailey.


In the next several posts I will give instructions for making your own Miss Hickory doll. But, you must read the story first!! That will surely influence your characterization of the doll.
Thanks to Salley Mavor for allowing me to present my version of a type of doll she has been making for many years. Salley has illustrated several children's book with her "stumpwork" fabric art, as well as presenting patterns and instructions for her charming little "Wee Folk" dolls.

Miss Hickory - Pattern & Instructions - Part 1

The doll's skeleton is made from four 6" pipe cleaners (which I find in, cough cough, tobacco and cigar shops; they are also sometimes generous with nice wooden cigar boxes!). One 6" cleaner forms the neck and bodice. A second one forms the two arms. Two more pipe cleaners form Miss Hickory's somewhat tall and lean legs. Measurements are given in the illustration below. (You should be able to click on it to enlarge.)


Loosely form the skeleton following the measurements above. The shoulders to the thighs will be firmly covered with bias tape, which will fill out the bodice and hold the pipe cleaner skeleton together.

Glue (Tacky glue is used on all parts of this project) the end of a long piece of bias tape to the back of the pipe cleaner torso just under the shoulders. Wrap the shoulders and torso with the bias tape, then the upper legs, then the torso again. Cut and glue the end on the back. This bias tape will not show under Miss Hickory's costume.


Hickory nuts come in a variety of shades of brown. I try to match the embroidery floss and bias tape to the color of the hickory nut. (See Part 4 for the hickory nut head, which goes on last, after all the clothes have been fitted and applied.)

Miss Hickory - Pattern & Instructions - Part 2

Glue end of a long piece of embroidery floss to the back of the bodice. After that dries, spread a small amount of glue on back of neck and wrap the floss up and down the neck (glue holds wraps in place). When you get to the shoulder area, spread a thin layer of glue on the front of the bias tape. This is important to keep the wraps smooth.


After shoulder is finished start wrapping one arm. Wrap all the way to the tip. Bend hand back about ¼” and wrap back up the arm. (See TIP elsewhere in the instructions.)

Remember when you are wrapping that Miss Hickory is made of an applewood twig, so her limbs will be skinny. Extra wrapping is not necessary. Unevenness and bumps, like a twig, are ok too!

Repeat on second arm, wrapping up to the tip, forming hand, and back to the top of arm. Glue floss to back of bodice, wait until it dries, and carry the floss down to the legs, just below the bias tape. (If it is easier for you to work with shorter lengths of embroidery floss – I work with the whole skein – you can wrap the top part of the doll, then with another piece the lower part of the doll.)

Wrap the embroidery floss down one of the legs to the ankle, about 1” from the end, then back up the leg and over to the other leg. Repeat, cut floss, and glue.

To make socks or boots, glue end of a different color of embroidery floss to the back of the lower leg. Start wrapping the new floss ½” above the ankle, over the lower part of the already wrapped leg. This makes it really look like socks or boots. Change the color another time to make the shoes a different color still.

Bend the tip of the covered pipe cleaner back about ½” to form the foot. Wrap back up the foot and lower leg. Put a dab of glue on the back of the leg where the ‘sock’ ends. When glue is dry, cut the extra floss. The lower leg should look something like this:

Miss Hickory - Pattern & Instructions - Part 3

Clothing for Miss Hickory. For the skirt, take a fabric flower apart. (Daisy-like flowers with many petals seem to work best, fewer petals need a little finessing.) Cut into the center of one of the layers of petals. You will also need to cut the hole bigger, to fit the doll’s waist.

Run a gathering thread at the waist near the edge (approximately 1/8”). Pull up thread, fit slightly below dolls waist, and tie off. Add a little glue there to hold in place. Let dry. Add a second layer of petals in the same way, this time at waist level.


Vest. Lay doll on a piece of paper towel. Draw around the bodice to make a pattern, adding an extra ¼” or more to make it fit around the body. Cut two matching pieces from the paper towel. Try your pattern on the doll, pinning at sides and shoulders. (You can pin it right to the doll, it’s too hard to try to pin the seams together!) You may have to adjust the pattern a couple times to get the fit right. When the fit is correct, cut two matching pieces from good quality felt.

My messy desk:


Embroider a couple flowers on the front of the vest, using one strand of floss and the lazy daisy stitch.


On all the edges that will not be seamed, I make a decorative buttonhole stitch, using one strand of floss. Do this before you sew the front and back together. Sew the shoulders and one side seam together with a small overcast stitch. Put the vest on the doll and sew the remaining side seam while the vest is on the doll.


Next, the head and accessories (hat and shoes).

Miss Hickory - Patterns & Instructions - Part 4

Miss Hickory’s head, face and accessories. Collect a bunch of hickory nuts. Let them dry in the sun, then peel off the outer shell. I say collect a bunch because they won’t all work. Sometimes you can’t get the outer shell off, or they may be stained, or too fragile.

When you get a good one, make a hole in the bottom with a utility knife, whirling the point around until the hole is big enough. Be careful; if you are working with a child this part should be done by an adult.

The hole may not be perfectly round, or centered. That’s ok, it just needs to be big enough for the pipe cleaner neck to fit. And if it is not centered, the doll’s head can tilt quizzically. Miss Hickory was a curious little doll!


Drop a blob of glue into the hole in the hickory nut, and push neck gently into hole. (Hickory nuts can be quite fragile.) Let dry thoroughly.

Take apart tiny fabric flowers. Apply glue in a ring around head and attach flowers. Let dry thoroughly, then glue some beads into the flower centers. Repeat on tops of shoes.

Maybe I shouldn’t, but I always leave the face painting for last. It seems that the doll tells me what kind of face it should have only after it is completely dressed.

Because hickory nuts are somewhat dark, you will have to apply white paint for the eyes, in an oval. I used an acrylic paint. When dry, the rest of the face painting is done with Micron Pigma Pens, both .005 and 1.0 sizes, in black and colors. Quilt shops and art supply stores usually carry these. Let face dry completely.


Pose Miss Hickory with her book. When you are reading the book to children, you can pass the doll around for them to hold while listening, imagining…..