Although
for 25+ years I have been in several EGA chapters (Rochester, San Diego,
Boston, Memphis), I have never attended a National Seminar until this year. Seminars are held all over the U.S., but this
year’s was close enough to drive to – Louisville, Kentucky.
Louisville
is a one day drive, but I stretched it to two days each way. Must have time for ambling along the NOT
interstate, at least part way, and stopping at interesting sites and……antique
shops!
Staying
at the Shaker Tavern http://www.shakermuseum.com/tavern/ in southeast Kentucky, I knew
there was good antiquing in nearby Franklin, a small city with a charming
courthouse square. After 15 minutes in
Bright’s Antique World, http://brightsantiqueworld.com/, I knew I should have a minimum
two hours to really look around, but it was getting close to darkness. Still, in 15 minutes I managed to find some
treasures!

I was
attracted by the pretty stationery box, but when I picked it up discovered it
was heavy and full of nice buttons – mostly small whites, clear cut glass in
several sizes, sets of enameled metal, vintage Czech glass buttons, and a
little envelope of bone rings!! Cost –
$5. Since I make jewelry with buttons, I
am always on the lookout for bargain finds.
Maybe everyone is on the lookout, because lately I have seen mason jars
and bags full of junk buttons in the $10 - $20 range, crazy.
It looks like a singleton button was started on one of the bone rings. I have a wonderful book, purchased in the Macclesfield Silk Museums this summer, on making passementerie buttons, including singletons. http://www.silkmacclesfield.org.uk/ http://www.ginabsilkworks.co.uk/ (author and supplier)
It looks like a singleton button was started on one of the bone rings. I have a wonderful book, purchased in the Macclesfield Silk Museums this summer, on making passementerie buttons, including singletons. http://www.silkmacclesfield.org.uk/ http://www.ginabsilkworks.co.uk/ (author and supplier)

The box
is displayed here on a cute piece of feed sack fabric, also found at Bright’s,
along with: antique 1910’s (Downton Abbey!) dress catalog and a mint condition Larkin
Company catalog. My sister has a little
Larkin desk, so I’ll send the booklet to her.

Love the "Don't Rub Your Life Away:

The next
day I drove into Louisville, for the first time!, but it was pretty easy to
find my way to the hotel. I arrived in
time for the opening banquet. The entrée
was very good, and they found an extra vegetarian meal for me, which I had
forgotten to request, very nice. The
‘famous’ Derby pie was stone cold (described in the menu as delicious warm with
whipped cream), and the banquet room was also frigid, temperature-wise.
The evening’s speaker was not able to attend (her house was flooded), and the replacement spoke for 5 – 10 minutes about a charity she works for. It is a good charity that helps struggling women. The original speaker was going to talk about the charity, plus her husband who is a retired, very winning jockey. I get that Louisville is all about the Derby, but thought the banquet program, after various awards were presented, would be about e m b r o i d e r y ….or…. hats! The banquet theme was hats, and lots of ladies wore fabulous hats (I forgot to bring one). The table decorations were a rather inexpensive, unattractive, straw-ish hat, which could be purchased for $5, but I didn’t see any takers on the hats!

Expensive
opening banquet rating: ««
My Monday
and Tuesday workshop was with Sylvia Murariu, “Partridge in a Pear Tree.” I learned how to make Romanian Point Lace, a name the teacher has given it. Sylvia said this
needle lace technique originated in Italy.
I love the portability of needle lace.
We even learned to make the small crocheted cording that the needle lace is
attached to. There was some needle
felting as part of the project, onto the canvas background, but I wasn’t
especially happy with mine, so I may use pre-felt, cut to shape, instead.


Sylvia has several books, many patterns, and some supplies at http://www.sylviaslace.com/

Check out this old booklet of needle laces online at:
http://www.cs.arizona.edu/patterns/weaving/books/archive_036.pdf
Ellen and Harriet did studio time Monday and Tuesday, called "Stable Time" at this seminar. Ellen is working on a pillow for her granddaughter, who loves horses. I asked how many horses she had to complete, answer "Thousands!" Harriet is working on a whitework piece.

FOOD (Very Important): We found a Mediterranean and Ethiopian
restaurant, just one block from our hotel, Addis Grill, http://www.addisgrill.com/
Delicious, healthy food! Got the
Ethiopian sampler platter, mmmmm!

Harriet and I also purchased the one week Fitness Center membership, a bargain at $10. Every day we walked the treadmills for 30 minutes or so, looking out (from the top floor of the hotel!) at the wide Ohio River below.
Wednesday was a day off. In the morning I walked to the Nulu (how cute, like SoHo, or NoHo) neighborhood, very close to downtown. A free trolley runs to it, but I never saw it go past (I was probably in a shop).
Joe Ley Antiques on Market Street has beautiful displays, on three floors of a historic building, of furniture, glassware, etc. But the things I like were either thin or for display only (an odd ‘general store’ behind chicken wire had a shelf full of old talc jars, all presumably n.f.s.!). This huge antique emporium offered merely ½ of 1 shelf of sewing related smalls. I did purchase a sweet little pin keep. Linens on second floor rather messy, nothing special, over priced. Pricing scheme was interesting – at the front door you are handed a little piece of paper with the pricing codes revealed. Everything has an ‘original’ and a ‘sale’ price, which seemed funny.

On the way back to the hotel I found, at St. Vincent de Paul Thrift Shop, a canvas tote bag, to carry my newly purchased books home. I also found a 90+ year old candy store! Muths has been making chocolate, taffy, caramels (Modjeskas are famous) and more since 1921. Why, oh why did I spend $10 for 4 (delicious) chocolates at Ghyslain, when just down the street I could have bought 40 (equally delicious) chocolates at Muths, for nearly the same price?! Of course, this did not stop me from loading up at Muths too! CC and I now have a pretty basket of assorted chocolate and candies between us on the couch in the tv room. We are mostly good and only eat one (1) piece per day. http://www.muthscandy.com/

http://louisville.styleblueprint.com/food-and-entertaining/muths-candies-a-louisville-favorite/
Wednesday afternoon I
took the offered artisan tour. The Louisville
Stoneware http://www.louisvillestoneware.com/
tour was really interesting! Although it
is not the style of pottery I would collect, our tour guide was excellent and
the factory workers very friendly. It
was very interesting to see the process from the large pile of raw clay to the
finished pieces out of the kiln.


The glass tour was a
disappointment. We were standing above and
behind the glass making floor, and a glass wall was between us and the glass
blowers. An apprentice was stationed
outside, and he was very good at explaining things. The exhibit of gallery glass was ok (inspired
by children’s books, I think). Nothing
unusual calling me in the gift shop.


Met Harriet for supper. Our favorite Mediterranean placed was not open yet, so we walked over to Hillbilly Tea on First Street. http://hillbillytea.com/

We had the best iced tea (3 kinds) and best BLT’s
(that’s biscuit, bacon, lettuce and tomato – mmmm!) while sitting at
the rustic front window table, watching passersby, including a large group of
suits (the last suit watched us watching and gave a wink!)
We had to rush back
to the hotel to attend the TVR (Tennessee Valley Region) party. Somehow we managed to walk down the
stationary escalator to enter the party, late, in the center of the room,
without our tickets. Embarrassing. The party was fun, short, and I won the table
decoration, a bag full of embroidery threads and floss!

SHOPPING! EGA Seminars include a wonderful bookstore and
semi-permanent vendor (Stitchville U.S.A).
Ruth Kern, http://www.ruthkernbooks.com/, ships books to the venue, and her tables were
loaded with new books and a few old classics on every topic of embroidery. I’m afraid I am more than a little addicted
to new, beautifully photographed books on too many subjects. I did purchase several books, including Jan
Messent’s "Celtic, Viking and Anglo Saxon Embroidery." Her artwork amazes me, and this book is about
making books out of fabric, fiber and stitches!
Makes me think of the occasional album you find of, say, crocheted stitch
samples. Taken to a whole different
level!

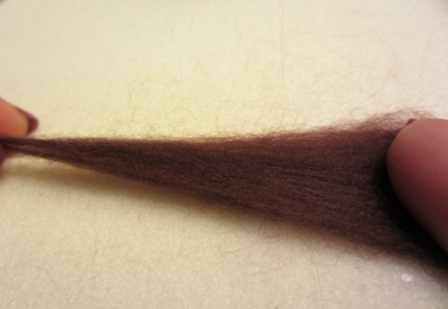
Also found, a new
felting book by Moy Mackay, http://www.moymackaygallery.com/product-category/current-exhibition/moy-mackay/
Moy makes beautiful pictures with
roving. I don’t think I’m going to make
pictures with roving, but her art is incredible, and this is a how to book.
On Tuesday evening we
had Merchandise Night, called "Tack Room" here at the Lousiville Seminar, when any person or group with something to sell can
rent a table. I think there were about
50 tables, not sure because I ended up working at one of them. I helped a dealer set up her booth. Ellen has lots and lots of older books and
booklets (smocking, ribbon embroidery, heirloom sewing, etc.), plus
supplies. She also has a large
collection of vintage and antique sewing notions, three very large boxes of
vintage carded buttons, and tons more.
After helping Ellen set up, I realized she was going to be alone, so I
stayed to help, which was good because her booth was mobbed as soon as the
doors opened, and stayed very busy for two hours.
I was not expecting
any payment, and was very pleased to help.
But Ellen did mark the price down on a sweet set of sterling silver
ribbon threaders. I’ll put these with my small collection of
silver chatelaine pieces Lulu and Carolyn have given me over the years. Note to Sharon: I took the photo before polishing them, they look real pretty polished!

I didn’t get to shop
at Merchandise night! Oh well, probably
best not to have that opportunity!
Shopping rating: ««««
A very good exhibit
of embroideries by Fiber Form members was in the great hall. Fiber Forum is interesting. You have to be juried in, and members are doing
some pretty creative things, but still in traditional techniques such as
cross-stitch and surface embroidery. I
loved “Starry Starry Night” by Jane Wheeler, the first place winner. The embroidery stitches seem to be done under
and over black netting. “Healing Box” by
Catherine Jordan was interesting, and gloves were placed next to it so you
could open to look inside. Peggy Huffine
showed two really cool embroideries of her dogs, very different. It looked like chiffon or fine netting was
placed over a drawing or picture of her dogs on fabric, with surface stitching embroidered
over the chiffon fabric that resembled the lines of a colored pencil drawing. Kind of.
This description does not do justice to the original. The eyes were wonderful!
EGA
National also brought out pieces from their collection, from early costume and fragments
of embroideries to contemporary works. Also
on exhibit were Group Correspondence Courses examples, and students’ pieces
from the Master Craftsman program.
Exhibits rating: ««««
On Thursday and
Friday Harriet and I took a class with Jane Nicholas, “Rose and Grape Hyacinth.” I only have five or six of Jane’s many books,
and it was thrilling to take a class with her.
She is the most professional, best teacher I have ever taken a class
with. Nothing is left out, steps are
well organized, timing is just right for introducing a new technique or stitch
just as it is needed. Our design was
teeny! Those little butterfly wings are
about 3/8” long. The long and short
stitch, oh boy, that might be my least favorite embroidery stitch. And making them on a 3/8” wing is quite a
challenge. But I think my one wing so
far completed looks pretty good. Jane
has a new book coming out soon, “Stumpwork Butterflies and Moths.” I can’t wait to add it to my collection. http://www.janenicholas.com/news/22/New-Butterflies-book-available-for-pre%252dorder.html

I asked Jane what
might be the next book in the series (after butterflies), perhaps spiders? But she said she would never do spiders, nothing
with eight legs! She indicated that
stick insects could be calling her.
Jane Nicholas class rating: «««««
“Certificates of Completion” kind of silly (how does the teacher know I am going to complete the project?!).
More FOOD! On Friday I didn’t want to go back to the
Mediterranean restaurant, for the 4th time. Got my car out of the garage, once we found
it, and drove back to Nulu. We had a
delicious lunch at Ghyslain, vichyssoise and leek and potato soups, big
salad, the best croissants, and I took home a key lime tart for later. Paintings and mosaics on exhibit at Ghyslain (the waiter did not know the artist's name):

Saturday, before
checking out of the hotel, we went to Nulu again to Toast, a happening eating place on
Market Street. The wait was 30 minutes,
but they told us to try the bar seating.
We found two spaces two seats apart.
A nice Louisville gentleman switched seats with us. We started a conversation with Paul, and he
has a wine / bourbon shop a few store fronts away. Of course we had to visit after our good but
not fabulous breakfast at Toast (pass on the hash brown casserole), and we took
home two lovely bottles of Kentucky bourbon.
Paul changes the wine tasting menu each week, with ten new wines
featured. There are also bourbon
tastings, $5. http://tastefinewinesandbourbons.com/
Another trip to
Muths? Well, Harriet had not been there
yet!
Food ratings,
Louisville: Galt House, not even one
star – banquet dinners so-so, express lunch only one “so,” and we tried
Magnolia twice, with disappointing results each time (I actually asked them to take the bread pudding off my bill!).
Ghyslain, Hillbilly Tea, and Addis Grill – each get ««««!
National EGA Seminar
Experience: «««« Teachers
very good to excellent! Shopping
fun! Exhibits very good. EGA Volunteers and staff friendly and
helpful. (When you think that almost the
entire seminar is planned and organized by volunteers, it is pretty amazing.) Hotel staff very nice. Hotel way too cold (it’s October, turn the ac
off!). Except when it was too hot in
some of the class rooms. Louisville has nice
walkable downtown neighborhoods, a nice river park nearby. Speed Art Museum closed for renovations,
completely closed with no satellite exhibits.
Harriet is a good
sport. She doesn’t mind taking the two
lane roads instead of the “Rivers of Trucks” (interstates), even though it meant
taking two days instead of one to get home.
And she keeps her tablet and eye out for possible DQ stops! We stayed overnight at the Shaker Tavern,
arriving there early enough on Saturday to go over to the Museum. I really love this small South Union Shaker
Village in Auburn, Kentucky. http://www.shakermuseum.com/ Only a
few furnished buildings remain and are open to the public, the large Centre
House building and smaller Ministry Shop, but the exhibits in these buildings are really
good. A new exhibit in one of the rooms
are pieces of metal grave markers that were recently excavated. (The person who purchased the Shaker land
after the village closed, in the 1920’s, bull-dozed the Shaker cemetery and
used the ground up stone to spread on his fields to enhance the soil. He also tore down many of the buildings.)


I love the laundry room. At least this woman got to sit down on the job for a little while!

In the background below is a recently renovated Shaker barn, where concerts are held for special events. Harriet and I found this foreground marker especially interesting (there are many markers on the grounds, where buildings once stood).


Poor Jenny. It seems the Shakers were very good to her.
The book store and
gift shop is really good! I found a new
book (new to me) there on Shaker commercial ephemera. I love the Shaker “fancy goods” and would like to try reproducing a
little sewing basket from woven poplar, if only I could find a source for woven
poplar.

The
Shaker Tavern is so nice, and the rates are quite reasonable. Joanne is a
wonderful hostess and cooks up good
breakfasts! The rooms are very
comfortable with simple antique furnishings.
Admission to the museum is free to guests at the Tavern.
Joann recommended a
wonderful place for dinner, Federal Grove, a few miles down the road from the
Shaker Tavern, and, interestingly, identical architecture (1870’s). That was the best meal, from salads to desert,
and very generous. http://www.federalgrove.com/ They
even make their own maple syrup, and describe themselves as "the southernmost maple syrup producer." Being a New Englander, I had to try it, and it
is good!
It was a fun week at my first EGA National Seminar. Now I have to get to work on my two class projects!!
Also purchased from Ellen, a sweet advertising card for Willimantic Thread. Whenever I see old Willimantic Thread ephemera I have to get it. Many years ago Charlie and I made a trip to Willimantic, Connecticut, to take a tour of the town and museum. We visited the textile and history museum, http://www.millmuseum.org/history/ and learned from the director that when the last of the thread mills closed the company owners, instead of donating machinery, artifacts etc. to the museum, carted everything to the dump. She had to go scavenging in the town dump for items to display in the museum. At the time, Willimantic was not looking very good, it seemed like a town down on its luck, like many other old New England mill towns. I hope things are better for Willimantic now. The museum website is very good, with a lot of information about the history of textile mills in the northeast.

I was able to 'fix' the card with Photoshop Elements.


