Well, after much delay here is the next step in my little dog! I thought I would try and show detailed steps of the process I took to attach her second leg. Yes, she's a girl. Her name is Sadie.
For the leg I used about this much roving:
Which I then folded in half...
And used the Green 5-needle tool until it looked something like this...
I found it helpful to keep rolling and folding the fiber to get it to compress into a leggish shape! Afterwards, I used the Pink 3-needle tool to shorten the length by inserting the needle at an angle into the leg, like so:
Here is a snap showing the size of the leg just before I attached it, as compared to the finished other leg:
It made sense to leave the leg just a little bigger, since you compress it more when attaching and shaping it.
So, I positioned the leg...
And used the Pink 3-needle tool to attach it at the back end:
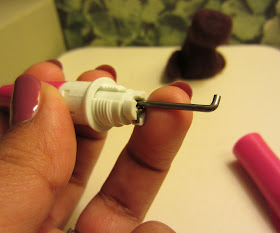
Once I had the leg stuck on at the back, I decided that just one needle would give me the detailed control to shape the leg (I still think it's amazing that you really can stick on a single piece of wool at a time!), so I decided to remove a couple of needles. You do this by unscrewing the white collar from the back of the pen to reveal the needle compartment:
Then you can just slide the extra needles out one at a time -
...and get to work shaping up the leg!
So, now she has two legs! She is all finished actually, and I will put up the rest of the process is another post (hopefully later today).
A Happy Mother's Day to all Moms out there - and especially to my mom, and aunt. The women I share this blog with constantly set an example for me of the way I should try to live my life - be happy, be encouraging, work for the things you believe in, do what you love and CREATE! Sounds like a marvelous plan! xoxo


Verklempt! Where's my hanky?!
ReplyDelete